.png?width=75&height=75&name=4.0%20(7).png)
Chapter 2
 📊Chapter 2.1: Excel
🎥 Video coming soon
A walkthrough video for this section is currently in the works. Check back shortly!
QVscribe for Excel includes a few unique features and workflows tailored to working with Excel sheets. This section covers what’s specific to the Excel integration, so you can work more efficiently with your requirements.
Selecting your Requirements
To analyze your requirements, you first need to add them to the QVscribe environment.

You can do this in one of two ways:
-
Select a cell or column with requirements and click Mark Requirement on the QVscribe
-
ribbon.
-
Right-click a selected cell or column and choose Mark Requirement from the menu.

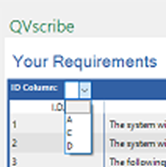
To ensure requirement IDs are preserved during analysis, define the column containing them by assigning the correct column number in the QVscribe window.
If your Excel workbook contains requirements across multiple sheets, QVscribe will add them per active sheet. Once multiple sheets have marked requirements, you can view either all requirements or only those from the active sheet.

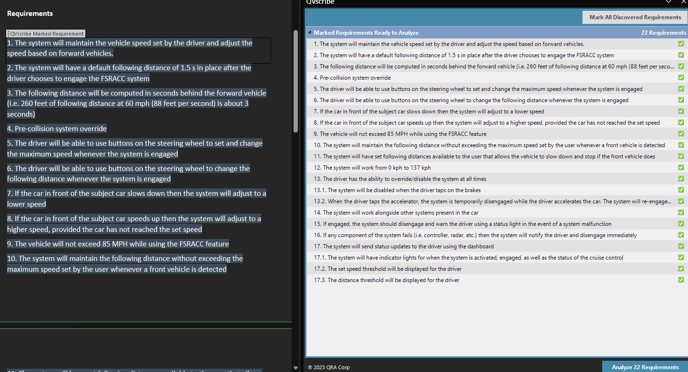
Selecting a requirement from the list will also highlight the corresponding cell in the worksheet. The total number of requirements ready for analysis is displayed on the Analyze button below the list.
🦖 Coach QRex: Use Excel’s filtering to quickly isolate and mark only the artifacts you want to analyze. This is especially useful when your sheet contains different artifact types, like user needs and requirements, with a column specifying the artifact type. You can then focus on marking and analyzing just one type, such as requirements.
Removing Single Requirements
To remove a single requirement from the analysis results list, click the X next to it. Keep in mind that this will invalidate the current Consistency and Similarity analyses, which must be rerun to update the results.

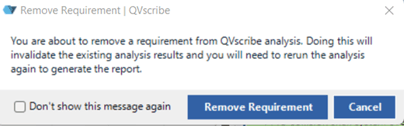
When you click the ‘X’, QVscribe will ask you to confirm if you want to remove the requirement. If you’d prefer not to see this confirmation in the future, simply check the ‘Don’t show this message again’ option.
Removing all Marked Requirements
When using QVscribe, metadata marks are added to identify the selected requirements. These marks make it easy to gather, view, and analyze requirements in one organized list.
If you need a clean version of your Excel document without QVscribe marks—such as when sharing with others who don’t use QVscribe—you can remove them by clicking Remove Marks in the QVscribe toolbar.

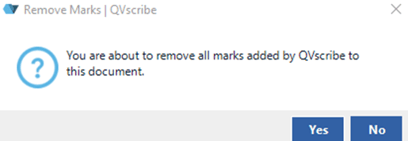
A confirmation window will appear asking if you want to remove all visible QVscribe marks from the document. Click OK to proceed or Cancel to keep the marks in place.
🦖 Coach QRex: Save a copy of your document with marked requirements before removing the marks—this can make future edits or revisions quicker and easier.
Go to the beginning of Chapter 2
Return to Table of Contents
📄Chapter 2.2: Word
🎥 Video coming soon
A walkthrough video for this section is currently in the works. Check back shortly!
QVscribe for Word includes a few unique features and workflows tailored to working with Word documents. This section covers what’s specific to the Word integration, so you can work more efficiently with your requirements.
Removing all Marked Requirements
Selecting your Requirements
To help QVscribe know which parts of your document to analyze, you’ll need to mark your requirements first. There are three main ways to do this:
Discover Requirements (Experimental)
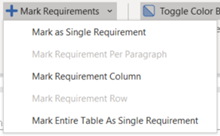
Marking Text
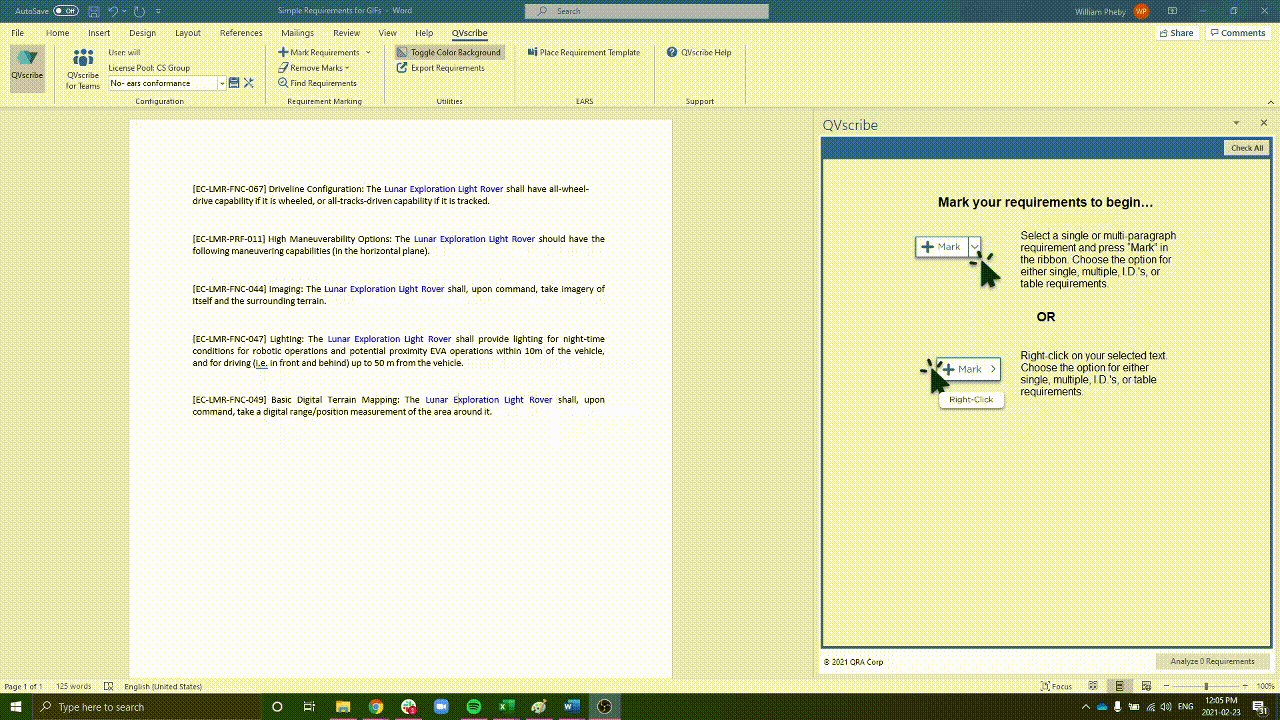
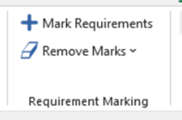
- Right-click the mouse and select ‘Mark Requirements’.
- Use the ‘Mark Requirements’ button on the QVscribe ribbon.
- Single Requirement

- Requirement Per Paragraph
- Requirement Column
- Requirement Row
- Entire Table As Single Requirement
Once marked, the requirement is instantly added to the “Checked and Available to be Analyzed” list, meaning it’s ready for analysis right away.
Marking a Table
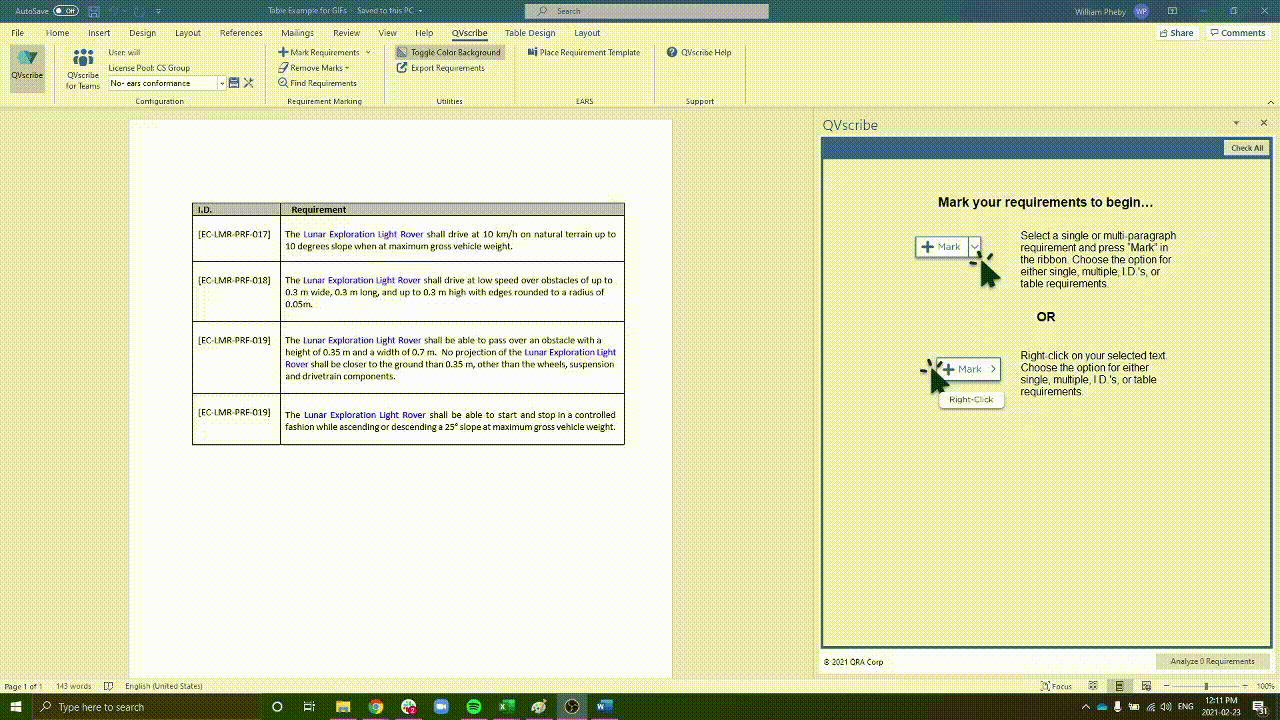
- Right-click the mouse and select ‘Mark Requirements’.
- Use the ‘Mark Requirements’ button on the QVscribe ribbon.
- Single Requirement
- Requirement Per Paragraph
- Requirement Column
- Requirement Row
- Entire Table As Single Requirement
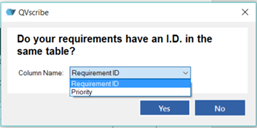 After choosing your requirement(s), QVscribe will prompt you to confirm whether the table includes a Requirement ID column. If it does, you can select it from a dropdown list of the table’s columns.
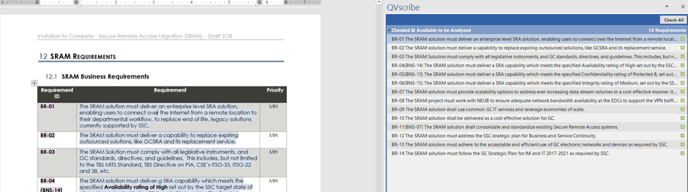
Using Discover Requirements (Experimental)
QVscribe for Word includes an experimental auto-detection tool called Discover Requirements, which identifies and highlights requirements in your document based on specific criteria. You can review these identified requirements before marking them for analysis.
🦖 Coach QRex: If your document doesn't follow requirement writing best practices, lacks requirement identifiers, or doesn't have requirements starting with a common word or phrase, the Requirements Finder tool may not be effective. In such cases, we recommend manually adding your requirements.
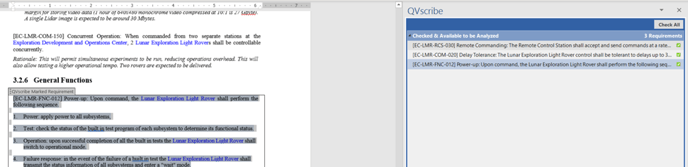
How it works: Requirements Finder analyzes the patterns in the requirement identifiers of the sample requirements you initially select and uses those patterns to locate other requirements in the document. For best results, ensure that the requirements are preceded by alpha-numeric identifiers, like R10.3, 2.3.34.2, 10T-34R, or Req. The example below shows a typical set of requirements with well-defined identifiers:
[EC-LMR-RCS-030] Remote Commanding: The Remote Control Station shall accept and send …
[EC-LMR-COM-020] Delay Tolerance: The Lunar Exploration Light Rover control shall …[EC-LMR-FNC-012] Power-up: Upon command, the Lunar Exploration Light Rover shall …
From these samples, Requirement Finder infers the common pattern ‘[EG-LMC-’ and uses it to search for other requirements in the document that begins with that same pattern.
How to use it: Select 3 well-spaced requirements to establish a clear pattern, then choose Discover Requirements from the Mark Requirements dropdown.
You can remove requirements directly from the Quality Analysis screen in QVscribe. Just click the ‘X’ on the far right of any requirement row. This will remove it from the QVscribe environment without changing the original content in your document, except for removing the QVscribe mark.

When you click the ‘X’, QVscribe will ask you to confirm if you want to remove the requirement. If you’d prefer not to see this confirmation in the future, simply check the ‘Don’t show this message again’ option.

You can also remove requirements directly from the Word document by right-clicking the marked requirement and selecting ‘Remove Content Control’. This is especially helpful for cleaning up any unintended or incorrect entries that were added to the QVscribe environment.

🦖 Coach QRex: Removing a requirement may impact the Consistency and Similarity analyses, as those results could depend on it. To update the results, select "Reanalyze All" after any removals.
Removing all Marked Requirements
When using QVscribe for Word, metadata marks are added to your document to identify selected requirements. These marks make it easier to collect, view, and analyze requirements in one organized list—and they’re essential for running a quality analysis.
If you need a clean copy of your document (without QVscribe marks), just click Remove Marks in the QVscribe toolbar. This is especially useful when sharing the document with others who don’t use QVscribe, as the marks may still be visible in Word.

🦖 Coach QRex: You can save a copy of your marked requirements documents before removing marks to further speed up any later revisions if needed.
Exporting Requirements
After marking your requirements in QVscribe for Word, you can export them as a CSV file by clicking Export Requirements in the QVscribe toolbar.

You can generate the CSV file in either a single-column format (labelled “MS Excel”) or a multi-column format compatible with the standard IBM® Rational® DOORS® structure.

We recommend disabling QVscribe analysis before exporting to ensure any issues are addressed early, helping prevent complications later in the development process.
🦖 Coach QRex: The export feature works as long as the requirements are marked. They do not need to be analyzed first. This can be especially helpful for quickly transferring requirements from Word into a requirements management tool.
📘 Summary:
In this section, you've learned about how QVscribe for MS Office integrates with Excel and Word, each with its unique setup and features. Here's a quick summary of what you discovered:
-
Excel:
-
Selecting Requirements: Specify the ID column and use Excel filters to isolate the artifacts you want to analyze.
-
Removing Single Requirements: Easily remove individual requirements from the analysis.
-
Removing All Marked Requirements: Clear all marks from your document when needed.
Word:
-
Selecting Requirements: Mark sections of text or tables.
-
Removing Single Requirements: Remove individual requirements from the analysis.
-
Removing All Marked Requirements: Remove all marks from the document.
-
Exporting Requirements: Export requirements to CSV for use in Excel or DOORS.
-
🦖 Coach QRex: Right-click the Remove Marks options (Selected and All) and the Mark Requirements options (e.g., by paragraph, as a single requirement, etc.) in the ribbon to add them to the Quick Access Toolbar. This creates hotkeys so you can quickly add or remove marks using “Alt” plus the assigned number.
By understanding these platform-specific differences, you're now equipped to maximize QVscribe’s capabilities no matter which tool you’re working with. 🗂️
Go to the beginning of Chapter 2